#The Swift Composable Architecture - A Review
I have dabbled in iOS development, on and off, for many years now. Starting back when UIKit and Objective-C were still the only platform choices, continuing with exploring RubyMotion, slowly making the transition to Swift, playing with React Native and then seeing SwiftUI come to life ... it's been an interesting journey. For a variety of reasons, none of the opinionated options in building an app ever really caught my fancy. Sure, Apple leaves a lot of questions unanswered for architecting an iOS app, but generic patterns like MVVM or MVC can be applied to iOS development without selling your soul to any large third party framework. The smaller the app is, the easier it also is to kind of get away with not really following a specific pattern.
Past fall I set out to explore SwiftUI, and there's no better way to explore a technology than to build something with it. So I chose to develop an iOS game based on the mechanics of one of my older memories of SUSE Linux: KDE Konquest. A new Xcode project was initialized and off I went. At this point I have to give a shout-out to John Sundell, whose website Swift by Sundell was an essential resource for finding quick and easy examples and explanations about SwiftUI features. As the app grew in size (user facing) and lines of code, I became more and more dissatisfied with the way things were shaping up. Clean, modular code and high test coverage are aspects of my work I value a lot. However, in growing the code base more and more, these aspects kind of fell by the wayside. Now granted, I fully accepted that and made a bit of an experiment out of the project to not care as much as I usually do. Still, deep down inside me I knew: if I ever wanted to release and maintain the game, I needed to find a sustainable way to add features and regression test the application. To make matters worse, the game is supposed to be played via Apple's Game-Center, which makes it notoriously annoying to play-test against yourself. I only own a single iOS device, so testing with my device and a simulator is the only choice I have. And believe me, Game-Center and the Xcode iOS simulators are not best friends!
Meet the Swift Composable Architecture
I had come across Pointfree a decent while ago and have been watching the videos Brandon and Stephen put out. They are excellent, you should subscribe! Amongst other topics, they introduced this iOS architecture they call The Composable Architecture. Now probably this immediately resonated with me because I am in a phase of preferring a functional, compositional style of programming by now, more so than wild mutations all over the place and OOP for the sake of it. Dabbling in React in the past probably also helped me in grasping the concept of unidirectional data-flow. In any case, after being annoyed by some horrible SwiftUI views I had produced, mixing state management, side effects, presentation logic and visual styling, I took the plunge and decided to adopt the composable architecture.
So what is the composable architecture? In essence, and the beauty of it is that I was able to type the following code out by memory, because there are almost no third party types involved, you can imagine your app being structured like this:
struct AppState : Equatable {
  bool isActive = false
}

enum AppActions : Equatable {
  case setActive(active: Bool)
}

let appReducer = Reducer<AppState, AppActions, ()> { state, action, _ in
  switch action {
  case let setActive(active: active):
    state.isActive = active
  }
  return .none
}

struct MyView : View {
  let store : Store<AppState, AppActions>

  var body : some View {
    Button(action: {
      WithViewStore(store) { viewStore in
        viewStore.send(.setActive(viewStore.isActive.toggle()))
      }
    }) {
      Text("Make active/inactive")
    }
  }
}
You have a struct describing your app's state, an enum describing every action that can happen,
as well as a reducer that performs any state mutations based on the action that was sent.
With that, you will not (have to) use @State in your view anymore. Your Button action will no longer
mutate any variables on it's own. Instead the button sends actions that are then being
handled by the reducer, which is essentially just a function taking the state and action as
inputs and mutates the state according to the action being taken. With that, let's move on
to what I like and dislike about it, having gradually migrated the entire Planeton application
to use this pattern.
Gradual migration
As I said, I didn't start with the composable architecture. I intentionally didn't use
any third party library to begin with, as those always come at a cost. Especially if you
wed your entire code-base to types you don't own. With third party libraries usually you
also take on the dependency of a package manager, as you don't want to copy & paste the entire
library into your own repository. Having previously felt some pain with using cocoapods and
"oh boy do I never want to go there again" the tooling that comes with react-native, I was very
weary in adopting one. However, as Xcode recently started to gain more and more support for
the Swift Package Manager, it appears here to stay and
at least get decent integration into Apple's walled gardens, better than e.g. cocoapods ever could.
Attempt 1 - Big Bang
Being an optimist on a side-project with nothing to lose, I figured, sure, let's just wholesale migrate to the composable architecture in one big bang. This, as you can imagine, failed miserably, as I stumbled from one issue (due to my lack of understanding) into the next, had to touch every single file in the project and therefore was in a constant state of not much of it working. With the outlook of spending weeks (remember, this is a side-project for nights and weekends) on just this re-architecting without moving the user-facing details any further along, I realized I had to scrap this branch and think fresh.
Attempt 2 - Gradually migrate
Atempt 1 wasn't a complete failure, as it helped me understand more of the architecture and made me aware of what to do:
Work in isolation! And by isolation I mean: pick a tiny feature in the app and migrate that, always keeping the scope
of the change small, avoiding ripple effects. The composable architecture has an API on the ViewStore type which enabled
me to achieve that: the .binding. Here is a short snippet demonstrating what I mean by that:
NavigationLink(
  destination: GameView(
    game: rowViewStore.binding(
      get: { $0 },
      send: { .update($0) }
    ),
    log: HappeningsLog()
  )
) {
  PlayableGameRowView(game: rowViewStore.game)
}
The GameView existed already and was in no way aware of the composable architecture migration. Instead of taking
a Store, it had a property defined for the Game-model:
struct GameView: View {
  @Binding var game: Game
}
I used this trick of getting a binding to something in the app's state countless times, as this allowed me to work on each view one after another.
With that strategy it was only a couple pull requests later, and I was fully running on the composable architecture. It is amazing how it shows time and time again: making many small problems out of a seemingly large problem is one of the most effective strategies to learn as a software developer.
Benefit 1 - Testing
As mentioned above, I specifically ignored automated tested for large parts of the app. I say for "large parts", and that mostly means: for everything touching SwiftUI. Straight from the beginning Planeton was structured in a way to have the core game logic implemented as a separate swift package not knowing anything about (or having access) the actual user-facing app. Schematically, it looked something like this:

Again, this allowed me to isolate changes and refactors, only re-working parts of the code-base that had to do with the iOS specific parts (views, mostly). I did not want to introduce the composable architecture to any of my core logic. But by introducing the composable architecture to those view-heavy parts, I gained a very welcome attribute of my code: Being able to test the behaviour of the app. This was one of the first tests I introduced, to one of the views that before was structured in a half-hearted MVVM approach:
class NewLocalGameViewTests: XCTestCase {
 func testInitialPlayers() {
   let uuid = UUID(uuidString: "A4A28AF2-E193-4966-A755-FF9D65A4A59B")!
   let store = TestStore(
     initialState: NewLocalGameState(),
     reducer: newLocalGameReducer,
     environment: AppEnvironment(uuid: { uuid })
   )

   store.assert(
     .send(.addInitialPlayers) {
       $0.playerRows = [
           NewLocalGameState.PlayerRow(id: uuid, name: "Alpha", color: .red),
           NewLocalGameState.PlayerRow(id: uuid, name: "Beta", color: .green),
       ]
       let newColors = Array($0.remainingRandomColors.dropFirst(2))
       $0.remainingRandomColors = newColors
       let newNames = Array($0.remainingRandomNames.dropFirst(2))
       $0.remainingRandomNames = newNames
     }
   )
 }
}
This (hopefully obviously) verifies that, whenever a new local game is created, the list of players is pre-filled with two players. Being able to easily test this kind of behaviour is certainly one of the main wins I immediately got out of the transition. Would I have been able to test this otherwise? Sure, the way this was approached with MVVM before, the view-model was also testable. I guess what most resonated with me was the way there is absolutely no magic to the reducer whatsoever. No need to declare a ton of manual bindings and observable objects. Make no mistake, the above test does not verify anything about the actual view. It is a test of the reducer. The view only interacts with this reducer by sending exactly this action to the store:
// somewhere in NewLocalGameView
.onAppear {
  viewStore.send(.addInitialPlayers)
}
Still, the reducer is where the meat of any logic sits, so having coverage for that was very welcome.
Now what I was very skeptical of when I first saw it, and still didn't like when I was
writing the tests, was that they relied on this weird store.assert(...) call.
This to me was too far removed from "normal" xUnit style testing and gave me an uneasy
feeling. Lucky for me though, since 0.17.0 of the library
the tests can be written without this magic store.assert(...) call 🥰.
Benefit 2 - Amazingly simple onboarding implementation
Now that the only dependency my views have is the Store, it was amazingly simple
to re-use the exact same views, which show when you play a game, for the onboarding
experience.
struct OnboardingView : View {
  let store : Store<OnboardingState, OnboardingAction>

  private let gameStore = Store<GameState, GameActions>(
    // set up initial game state for a demo game ...
  )

  var body : some View {
    VStack {
      Text("Welcome to the app")
      GameView(store: gameStore)
    }
  }
}
Just like that! No need to shoehorn in custom behaviour into the GameView just for onboarding, no need to define an interface for a view-model. Why even have a separate store? I ultimately decided to implement another reducer to change the behaviour of the game when played via the onboarding flow. This could probably also be done by combining the existing reducer somehow, but this worked well for me.
Benefit 3 - Easy automation of app-store related tasks
If you ever shipped an iOS app, you'll know that preparing assets for the App-Store is actually a pretty big ordeal. Trailer videos, preview snapshots, marketing material etc. all need to be provided for ideally at least two different phone sizes. Now if you haven't automated the creation of all those assets, you'll spent a lot of time re-creating them for each release. There's a better approach though, again, falling pretty much out of the composable architecture for free: Take one of your views, set-up a store with pre-filled data you'd like to be in the screenshot, and snapshot this view. The way this looks for my home-screen snapshot is the following:
// I wrap my view in a simple snapshot view ...
struct AppStorePreviewHome: View {
  let store = Store<AppState, AppActions>(
    initialState:
    .init(
      activeGamesState: .init(
        remotes: [
          .init(
            remote: .init(
              game: .mock,
              match: .mock,
              localPlayer: .authenticated
            ),
            moveInProgress: .canceled,
            selectedFields: .none,
            turn: Game.mock.makeCurrentTurn()
          ),
        ],
        gameKitStatus: .finished,
        selectedRemoteGame: nil
      ),
      onboardingState: nil,
      playingMusic: true
    ),
    reducer: .empty,
    environment: AppEnvironment.failing
  )

  var body: some View {
    PlanetonView(store: store)
      .background(SwiftUI.Color.black.edgesIgnoringSafeArea(.all))
      .accentColor(.planetonAccent)
  }
}

// an snapshot it ...
class Snapshots : XCTestCase {
  func testHome() {
    assertSnapshot(
      matching: AppStorePreviewHome(),
      as: .image(layout: .device(config: .iPhone8Plus))
    )
  }
}
Note that the assertSnapshot assertion helper springs from another one
of Brandon's and Stephen's libraries: swift snapshot testing.
In order for all of this to work flawlessly, again, isolation is so important. You
need your views isolated from side-effects, or behaviour you cannot control from the outside.
With the composable architecture, you can achieve that with ease.
Now all of that can pretty much work with your Xcode project being structured however you want. For the trailer preview videos however, I needed to be able to create another iOS app target, which is able to instantiate the same views as the main Planeton app.
To reach that, ultimately, Planeton's structure now looks like this:
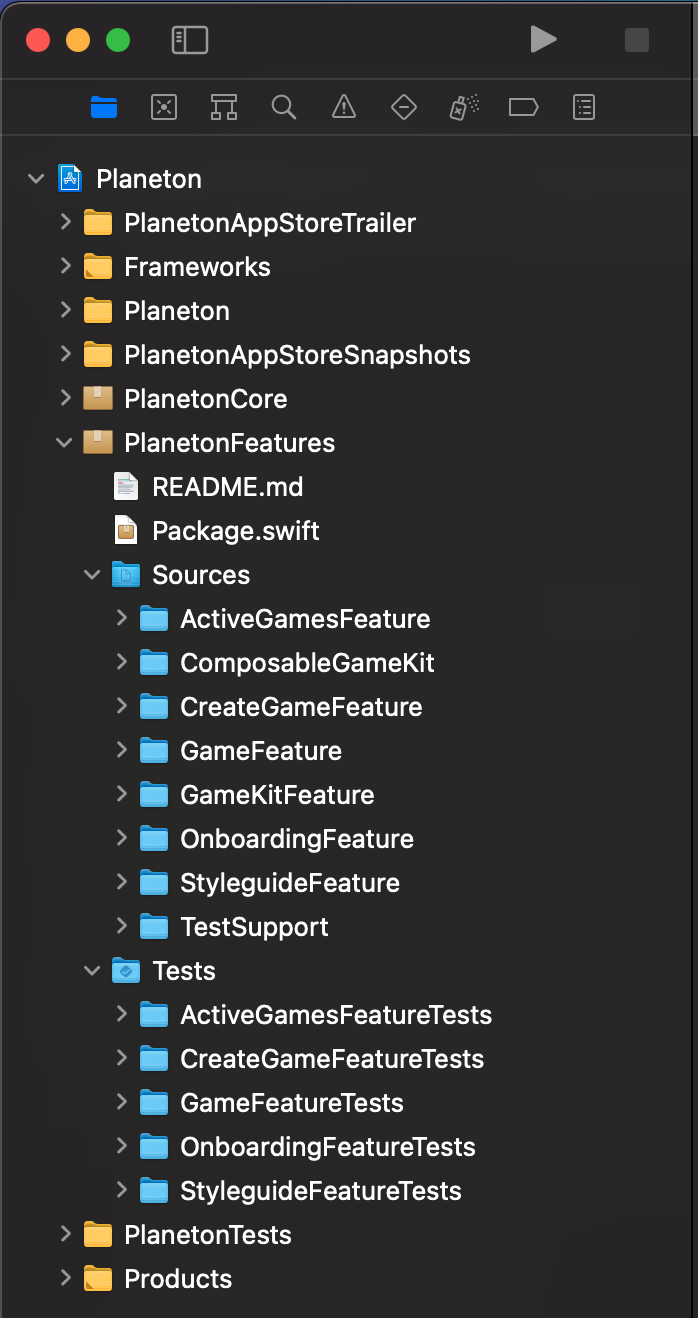
Most of the targets and modules should be self-explanatory. PlanetonCore is the core game logic, that doesn't concern itself with any UI. PlanetonFeatures is a swift package consisting of a few targets, scoped to either some generic task (like wrapping the GameKit API), or specific Planeton features.
With this structure, it was easy for both the main app (Planeton) as well as the trailer app target (PlanetonAppStoreTrailer) to `import GameFeature` and really play the game respectively just replay some sample game.
It is probably worth mentioning that you can achieve similar tasks with e.g. a UI testing target. However, you gain so much control with this structure here that I found it to be absolutely worth following it. Last time I really used it, UI testing through Apple's framework was also very slow, brittle and I stopped investing into it. This is a lot nicer!
Wrap-Up
However skeptical I was when first looking at examples of the composable architecture, I must say I am super happy having used it. I really feel like none of the choices hold me back, quite the opposite, many features where a joy to implement because of the structure it suggests.
Strong suits to me where:
- Fast, non-ui-driven testing in isolation
- Composition of small, isolated parts into a bigger whole
- Small API, barely coupling my app to a third party library
To finish off, I strongely suggest looking at the isowords repository. Isowords is a game of theirs also using the composable architecture and does a good job of showing production usage in a decently sized app. I think all of the points I talked about can be seen in their repository as well. It was a great inspiration and learning resource for myself for sure.